

Checklist for Upscale Bar Setup: 2026 Home Guide
An upscale bar setup checklist is a curated list of spatial, equipment, and design essentials that transforms a home bar into a functional entertainer’s centerpiece. The industry term for this planning process is bar outfitting, and it covers everything from aisle clearances and counter heights to glassware selection and layered lighting. Most home bar projects fail not because of budget but because of sequencing: people buy bottles and barware before confirming the space actually works. This guide follows commercial bar planning logic, adapted for the home, so your setup looks polished and performs under pressure.
1. Checklist for upscale bar setup: start with spatial planning
Space planning is the single decision that determines whether every other investment pays off. Clearances are the backbone of bar planning. Without proper geometry, no amount of premium finishes or equipment compensates for a cramped, unusable layout.
The bartender aisle width should fall between 31 and 37 inches. Narrower than 31 inches and you cannot open refrigerator doors or crouch to reach lower shelves. Wider than 37 inches and you add unnecessary steps between your ice, tools, and glassware.
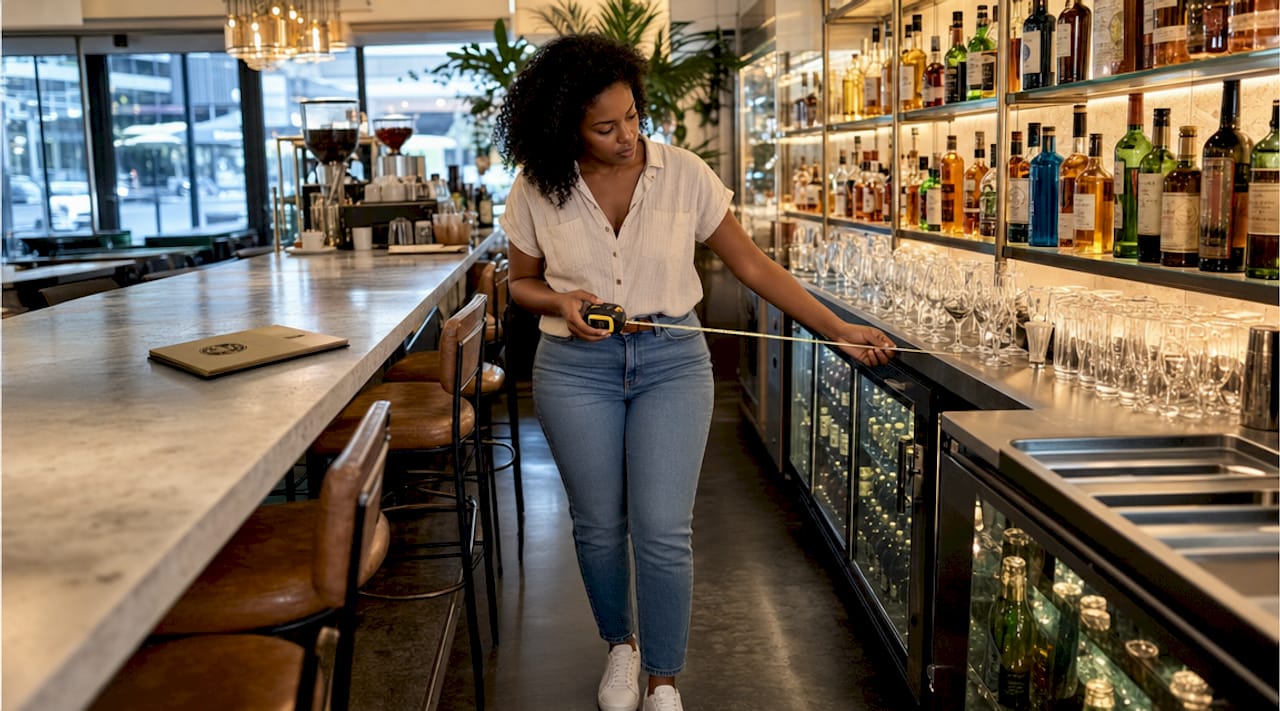
Counter heights follow a two-tier standard. Serving counters sit at 36 inches for comfortable prep work, while bar-stool seating requires a 42-inch top with adequate knee clearance underneath. Getting this wrong means guests either hunch over their drinks or feel perched uncomfortably high.
Circulation paths for guests matter as much as the work aisle. Allow at least 18 inches between bar stools and any wall or furniture behind them. This prevents the awkward shuffle that signals an amateur setup.
Pro Tip: Draw your bar layout to scale on graph paper or in a free tool like SketchUp before ordering any cabinetry or appliances. Validating clearances in plan view takes 30 minutes and prevents thousands of dollars in mistakes.
2. Zoning your bar for workflow and hygiene
Professional bars divide their footprint into three distinct zones: wet, dry storage, and service. Separating wet and dry zones reduces cross-contamination and dramatically improves speed during busy service. This principle applies directly to home bars.
The wet zone contains your sink, ice maker, and any refrigeration. Plumbing and drainage live here. The dry storage zone holds spirits, mixers, and non-perishable supplies. The service zone is the counter space where drinks are built and handed to guests. Keeping these three areas distinct means you never reach across a dirty glass to grab a bottle.
High-performing setups place key items within one or two steps of each other, which improves speed and guest experience noticeably. Map your most-used sequence (ice, spirit, modifier, glass) and confirm each element sits within that two-step radius.
3. Essential equipment: the upscale bar equipment list
Every upscale bar equipment list starts with the same core toolkit. The essential tools are a cocktail shaker, jigger, Hawthorne strainer, fine mesh strainer, muddler, bar spoon, channel knife, and a quality wine key. Match your tools to your intended drink menu. A bar focused on stirred whiskey cocktails needs a weighted mixing glass and a Yarai-style bar spoon. A bar built around fresh-juice sours needs a citrus press and a fine mesh strainer.
For appliances, prioritize a beverage center or under-counter refrigerator, a countertop or undercounter ice maker, and a two-compartment bar sink. Wet bar installation requires licensed plumbing for supply lines, drain, and venting. GFCI outlets are non-negotiable near any water source. Skipping this step creates both a safety hazard and a warranty issue for your appliances.
Surface materials deserve the same scrutiny as tools. Quartz, stainless steel, and sealed hardwood all tolerate moisture well. Avoid unsealed marble near the sink area. It stains from citrus juice within weeks.
Pro Tip: Buy one quality version of each core tool rather than a full set of mediocre ones. A Cocktail Kingdom weighted shaker and a Oxo jigger outperform a 20-piece budget kit every time.
4. Selecting glassware for versatility and style
Glassware is where bar outfitting intersects most visibly with personal style. The practical foundation is six each of three shapes: rocks glasses, highball glasses, and coupe or Nick & Nora glasses. This core set of six covers the majority of cocktail needs without overbuying. It also gives you enough for a dinner party without requiring a dedicated storage room.
| Glass type | Primary uses | Key advantage |
|---|---|---|
| Rocks (Old Fashioned) | Whiskey neat, Negroni, Old Fashioned | Versatile, works with ice or without |
| Highball | Gin and tonic, Mojito, Collins | Tall format suits carbonated drinks |
| Coupe / Nick & Nora | Martini, Daiquiri, Sidecar | Elegant silhouette, no stem wobble |
| Wine glass | Red, white, sparkling | Covers wine service for guests |
| Champagne flute | Sparkling wine, French 75 | Preserves carbonation longer |
Specialty glassware like copper Moscow Mule mugs, Tiki vessels, or crystal decanters adds personality but should come after the foundation is set. Explore must-have bar glasses to understand which specialty pieces deliver the most visual impact per dollar.
Display a select few pieces at eye level where guests can appreciate the craftsmanship. Store the rest in closed cabinetry. Overcrowded open shelving reads as clutter, not abundance.
5. Lighting and ambiance: creating a premium bar atmosphere
Lighting is the most underbudgeted item in home bar design and the one with the highest return on atmosphere. Layered bar lighting requires three distinct layers: ambient (overall room illumination), task (focused light for prep work), and accent (decorative highlights on bottles and surfaces).
Warm white LEDs at approximately 2700K are the standard for upscale hospitality environments. Warm white at 2700K flatters skin tones and makes the amber and ruby colors of spirits glow in their bottles. Cool white lighting above 4000K creates a clinical feel that works against the mood you are building.
Back bar lighting and under-shelf LED strips serve double duty. They illuminate your bottle collection as a visual feature while providing enough task light to read labels and measure accurately. Dimmers on every circuit give you full control over the transition from prep mode to entertaining mode.
- Ambient layer: recessed ceiling fixtures or a statement pendant above the bar
- Task layer: under-cabinet LED strips at the work counter
- Accent layer: back bar LED strips behind bottles, toe-kick lighting on lower cabinets
- Control: smart dimmer switches or a scene controller for one-touch transitions
Pro Tip: Set two saved lighting scenes on your smart dimmer: one at 80% for setup and cleanup, one at 30% for entertaining. The difference in perceived atmosphere is dramatic and costs nothing extra after installation.
6. Storage and display: blending function with presentation
Combining curated visible displays with hidden storage is the defining characteristic of upscale bar design. The goal is a space that looks intentional, not stocked.
Limit on-display items to four to six of your most-used bottles and a small selection of essential tools. Every additional item on the open shelf dilutes the visual impact of the pieces you actually want guests to notice. Think of it the way luxury retail displays product: fewer items, more space around each one, better lighting.
For shelving design, retail shop shelving principles translate directly to home bar displays. Adjustable shelves at varying heights accommodate decanters, standard bottles, and short rocks glasses without wasted vertical space. Closed lower cabinetry handles bulk storage: backup bottles, mixers, bar tools, and cleaning supplies.
Ventilation matters more than most people expect. Refrigeration units and ice makers generate heat. Without adequate airflow around these appliances, compressors run harder and fail sooner. Leave at least two inches of clearance on the sides and back of any refrigeration unit.
Organize your display by category and frequency of use. Spirits you reach for every session sit at eye level. Specialty bottles and seasonal additions go on upper shelves. Garnishes, bitters, and syrups stay in the wet zone, close to the build area.
Key takeaways
A well-executed upscale home bar requires spatial planning first, then equipment, glassware, lighting, and storage in that sequence.
| Point | Details |
|---|---|
| Clearances come first | Validate aisle widths of 31 to 37 inches before ordering any cabinetry or appliances. |
| Zone your workflow | Separate wet, dry storage, and service areas to mirror professional bar efficiency. |
| Glassware foundation | Stock six each of rocks, highball, and coupe glasses before adding specialty pieces. |
| Layer your lighting | Use ambient, task, and accent layers at 2700K with dimmers for full atmosphere control. |
| Curate your display | Limit open shelving to four to six bottles and key tools to maintain a sophisticated look. |
What I’ve learned building upscale home bars that actually work
Most people approach a home bar project the way they approach decorating a room: they start with what looks good. That instinct produces beautiful bars that are genuinely unpleasant to work behind. I have seen setups where the ice maker sits three steps from the build station, where the only outlet is on the wrong wall, and where the lighting makes every drink look like it was poured under fluorescent hospital lights.
The counterintuitive truth is that the decisions that matter most are invisible to guests. Aisle width. Outlet placement. Drain slope. Counter height. Get these right and everything else, the glassware, the bottles, the lighting, falls into place naturally. Get them wrong and no amount of beautiful barware fixes the experience.
I also push back on the instinct to buy everything at once. A bar built incrementally, with one excellent spirit category at a time and one quality glassware set before the next, ends up more coherent and more personal than a bar assembled in a single shopping session. The benefits of quality barware compound over time. One exceptional crystal coupe on the shelf signals taste more clearly than twelve mediocre ones.
The final pitfall worth naming: neglecting the retail display mistakes that plague overcrowded shelves. Restraint in display is a skill. Practice it from day one.
— Sharbel
Elevate your bar with Thegildedcup’s curated drinkware
Thegildedcup specializes in luxury glassware and fine drinkware that makes the display side of your bar setup genuinely worth showing off. Whether you are building your foundation set of coupes and rocks glasses or adding a statement piece to an existing collection, the curated selection at Thegildedcup is chosen for craftsmanship and visual impact.
The enamel mug collection at Thegildedcup is a particularly strong example of how functional barware can double as display-worthy decor. Each piece is built for use and designed to be seen. Browse the full elegant bar accessories guide on the Thegildedcup blog for a deeper look at what belongs on your shelves in 2026.
FAQ
What is the ideal aisle width for a home bar?
The bartender work aisle should measure between 31 and 37 inches. This range allows full range of motion and appliance access without adding unnecessary steps between key work stations.
How many glasses do I need for an upscale home bar?
Start with six each of rocks, highball, and coupe or Nick & Nora glasses. This set covers the majority of cocktail styles and handles a standard dinner party without requiring excess storage space.
What color temperature is best for bar lighting?
Warm white LEDs at approximately 2700K are the standard for upscale bar environments. This temperature flatters skin tones, enhances the color of spirits in bottles, and creates the intimate atmosphere associated with high-end bars.
Do I need a licensed plumber for a wet bar?
Yes. Wet bar installation requires licensed plumbing for supply lines, drain connections, and venting. GFCI outlets near any water source are also required by code in most jurisdictions and protect both guests and appliances.
How many bottles should I display on open shelving?
Limit open display to four to six bottles at any time. This restraint creates a curated, intentional look rather than a cluttered stockroom appearance, which is the defining visual difference between an upscale bar and a casual one.
Recommended
- Elevate Your Home Bar: 12 Must-Have Luxury Accessories - The Gilded – The Gilded Cup
- Barware Trends 2026: Top 10 Picks for Your Home Bar – The Gilded Cup
- Elegant bar accessories list: the affluent collector’s guide – The Gilded Cup
- Benefits of quality home barware: the affluent host’s guide – The Gilded Cup