

Step-by-step cocktail serving: master elegant presentation
There’s a moment every home bartender recognizes: you hand someone a drink and their eyes light up before they even take a sip. That reaction isn’t accidental. It comes from deliberate choices about glassware, technique, temperature, and presentation working together in one seamless experience. The difference between a forgettable mixed drink and a genuinely memorable cocktail isn’t always the spirit you choose or the recipe you follow. More often, it’s the details of how you prepare, mix, and serve. This guide walks you through every step, from setting up your workspace to the final garnish, so your home bar consistently delivers that five-star impression.
Table of Contents
- The essential toolkit: Gear and glassware for cocktail success
- Step-by-step mechanics: Mixing, chilling, and dilution mastery
- Straining, garnishing, and ice: The finishing touches
- Troubleshooting and expert nuances: Achieving flawless results
- A fresh perspective: Why elegance in home cocktail service matters more than ever
- Elevate your cocktail experience with premium drinkware
- Frequently asked questions
Key Takeaways
| Point | Details |
|---|---|
| Prepare with precision | Chill glassware and measure every ingredient for flawless consistency and presentation. |
| Master mixing techniques | Use shaking, stirring, or throwing correctly to control dilution, aeration, and temperature. |
| Polish with finishing touches | Straining, superior ice, and thoughtful garnishes elevate cocktails from good to great. |
| Elegant glassware matters | Serving in premium drinkware enhances visual appeal and the overall experience. |
| Troubleshoot and refine | Understand common mistakes and adopt expert nuances for consistent, upscale results. |
The essential toolkit: Gear and glassware for cocktail success
Before you shake or stir a single drink, your workspace needs to be organized into three clear zones: prep, pour, and serve. The prep zone holds your tools, ice, and ingredients. The pour zone is where mixing happens. The serve zone is where finished drinks land, ready for presentation. This separation keeps your workflow smooth and prevents the frantic scrambling that leads to spills and rushed pours.
Your core tools should include a jigger, a cocktail shaker (both Boston and cobbler styles are useful), a Hawthorne strainer, a fine mesh strainer, and a bar spoon. Each one has a specific job, and skipping any of them shows in the final glass.
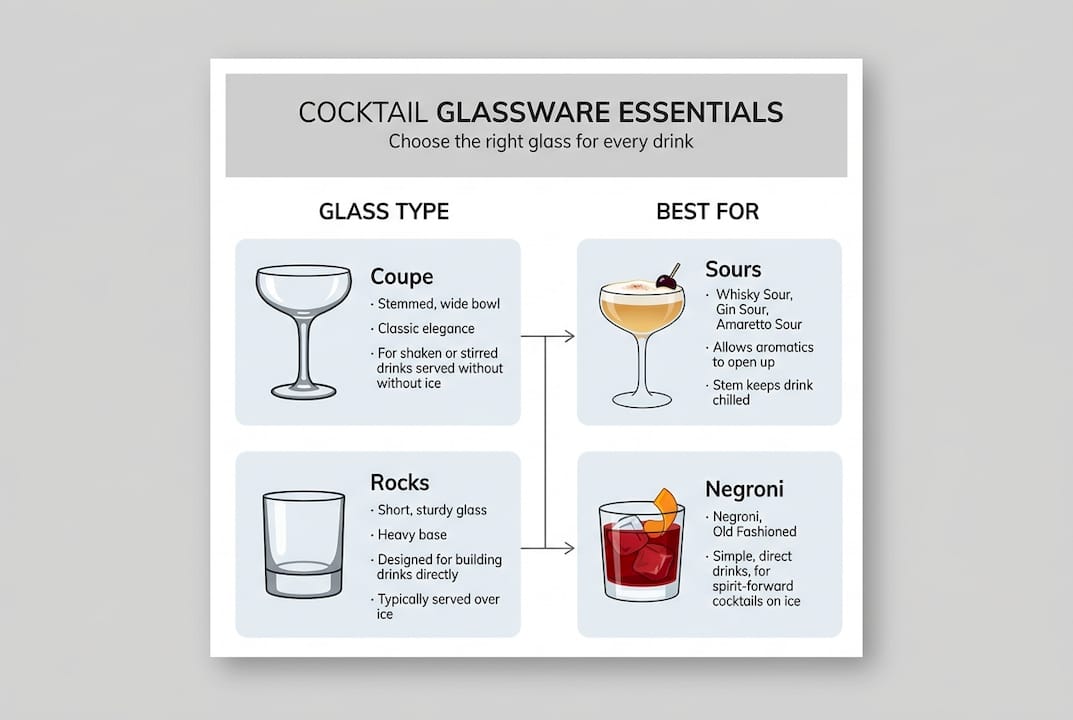
Glassware matters more than most home bartenders realize. Types of cocktail glasses directly shape the drinking experience: wide rims on coupes amplify aroma, while stems prevent your hand from warming the drink. A rocks glass holds large ice and concentrates bold flavors. A highball keeps carbonation alive and showcases layered builds. Choosing the right glass isn’t decorative; it’s functional.
Home bartenders should chill glasses, measure with a jigger, and select the right glassware for the drink. Chill your glassware by filling it with ice water for two minutes before pouring. This step alone elevates temperature control dramatically.
Essential tools at a glance:
- Jigger (1 oz / 2 oz dual-sided)
- Boston shaker or cobbler shaker
- Hawthorne strainer
- Fine mesh (tea) strainer
- Bar spoon (long-handled, twisted)
- Muddler and channel knife for garnishes
| Glassware type | Best for | Key benefit |
|---|---|---|
| Coupe | Daiquiris, Sidecars | Wide rim amplifies aroma |
| Rocks glass | Old Fashioneds, Negronis | Holds large ice, concentrates flavor |
| Highball | Mojitos, Gin and Tonics | Keeps carbonation, shows layered builds |
| Nick and Nora | Martinis, Manhattans | Elegant, smaller volume for spirit-forward drinks |
Pro Tip: Always measure with a jigger, even when you think you know the pour. A quarter-ounce difference in citrus or sweetener can throw off the entire balance of a cocktail.
Step-by-step mechanics: Mixing, chilling, and dilution mastery
With your toolkit ready and luxury glassware chosen, let’s move into the mechanics: mechanical technique is where good becomes great.
Every mixing method serves a different purpose. Shaking for citrus, dairy, or egg drinks yields rapid chilling and dilution, while stirring gives clarity and a silk texture to spirit-forward classics. Choosing the wrong method for your drink is one of the most common mistakes at home bars.
How to shake, stir, or throw:
- Shaking: Add ingredients to the shaker with ice. Seal tightly and shake vigorously for 10 to 15 seconds. The shaker should feel uncomfortably cold in your hands, which signals proper chilling. Use for drinks with citrus juice, cream, or egg whites.
- Stirring: Combine ingredients in a mixing glass with ice. Use your bar spoon to stir in smooth, controlled circles for 30 seconds. Lift and turn gently; you’re not trying to aerate the drink. Use for spirit-forward cocktails like Martinis and Negronis.
- Throwing: Pour the drink from one vessel to another from a height of 12 to 18 inches, repeating 4 to 6 passes. Throwing introduces aeration without cloudiness, making it ideal for drinks like Martinis that benefit from slight texture without becoming opaque.
| Method | Temperature drop | Dilution | Best for |
|---|---|---|---|
| Shaking | High | Higher | Citrus, egg, cream drinks |
| Stirring | Moderate | Lower | Spirit-forward classics |
| Throwing | Moderate | Low to moderate | Martinis, delicate spirit drinks |
Dilution is not a flaw; it’s a feature. Water opens up flavors in spirits and softens sharp edges. The goal is controlled dilution, not zero dilution.
Pro Tip: When using egg whites, dry shake first (shake without ice) for 10 seconds to build foam, then add ice and shake again. This produces a dense, stable froth that holds its shape beautifully on top of the finished drink.
Straining, garnishing, and ice: The finishing touches
Now that your drink is properly mixed, it’s time for the crucial finishing steps that distinguish a good cocktail from an exceptional one.
Straining removes ice shards and pulp, and the method you choose affects both clarity and mouthfeel. Use a Hawthorne strainer for shaken drinks and add large clear ice cubes for slow dilution in rocks glasses. For stirred drinks, always double-strain through both the Hawthorne and a fine mesh strainer to achieve crystal clarity.
Straining and finishing steps:
- Place your chilled glass in the serve zone.
- Hold the Hawthorne strainer firmly over the shaker or mixing glass.
- Pour steadily; don’t rush or tilt too aggressively.
- For stirred drinks, hold the fine mesh strainer over the glass and pour through both strainers simultaneously.
- Wipe the rim of the glass with a clean cloth if any liquid touched it.
Ice quality changes everything. Ice quality is critical; flavor longevity is improved by colder, narrow-rimmed glasses. Large, clear cubes melt slowly and dilute predictably. Cloudy or small ice melts fast, floods the drink with water, and flattens the flavor within minutes.
Garnish principles:
- Match the garnish to the drink’s dominant aroma (citrus twist for citrus-forward drinks, herb sprigs for herbal cocktails)
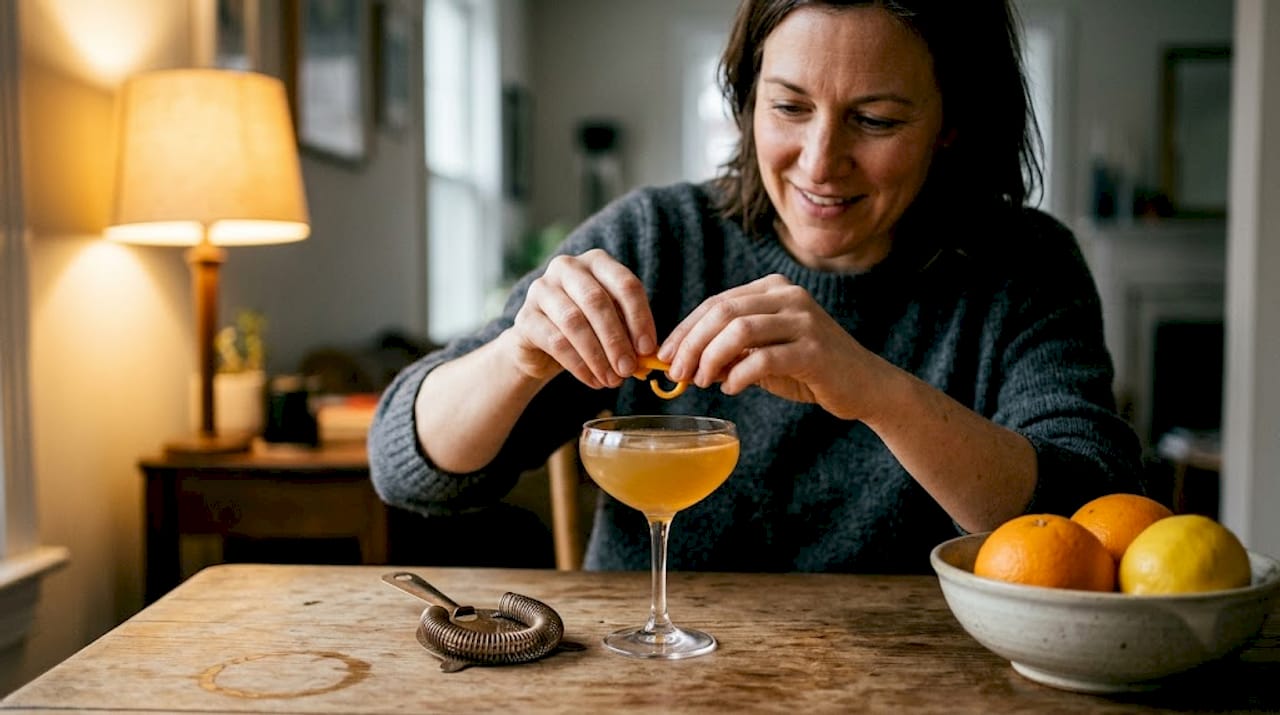
- Express citrus peels over the surface before placing to release aromatic oils
- Use a channel knife for elegant spirals rather than rough-cut wedges
- Place garnishes gently; don’t drop them in
“The garnish is the first thing a guest sees. It signals your intention and sets the tone for every sip that follows.”
Troubleshooting and expert nuances: Achieving flawless results
Even with the right tools and steps, occasional slip-ups can happen. Here’s how to spot and solve them, plus push your skills further.
The three most common home bartending mistakes are over-dilution, poor ice quality, and unbalanced pours. Over-dilution happens when you shake or stir too long, or when you use small, wet ice that melts instantly. Optimal dilution of 15 to 25% is achieved by using dense ice and precise stirring or shaking durations. Stick to your timing and use large, dry ice straight from the freezer.
Common mistakes and fixes:
- Watery cocktail: Ice was too small or too warm. Use large, freezer-cold cubes and reduce shaking time.
- Unbalanced flavor: Skipped the jigger. Measure every ingredient, every time.
- Cloudy stirred drink: Didn’t double-strain. Always use a fine mesh strainer for spirit-forward cocktails.
- Flat foam on egg white drinks: Skipped the dry shake. Always dry shake first, then wet shake with ice.
- Warm drink on delivery: Forgot to chill the glass. Build the chilling step into your prep routine.
For those ready to push further, expert nuances include saline drops to enhance flavor, dry shaking egg whites, and throwing for delicate aeration. A single drop of 20% saline solution (salt dissolved in water) added to a finished cocktail enhances sweetness and rounds out harsh edges without making the drink taste salty. It’s a professional bar trick that costs almost nothing and makes a noticeable difference.
Pro Tip: Practice your shaking and stirring technique with plain water and ice before using spirits. You’ll get the motion right, learn how your ice behaves, and build muscle memory without wasting a drop of good liquor.
A fresh perspective: Why elegance in home cocktail service matters more than ever
Here’s something the cocktail world doesn’t say loudly enough: your guests will remember how a drink made them feel far longer than what was in it. Home entertaining has grown significantly in recent years, and with it, the bar for what counts as a memorable experience has risen. But most hosts chase complexity, rare bottles, and elaborate recipes when the real opportunity is sitting right in front of them.
A perfectly chilled coupe, a precisely expressed citrus peel, a drink handed over with intention rather than haste. These details communicate care. They tell your guest that this moment was worth preparing for. A well-presented batched Negroni served in beautiful glassware will outperform a technically complex cocktail served in a random tumbler every single time.
The uncomfortable truth is that luxury in home cocktail service is mostly about workflow and attention to detail, not rare spirits or exotic ingredients. When you invest in the right glassware and practice the fundamentals, even a simple gin and tonic becomes an event. That’s the real shortcut to becoming the host everyone remembers.
Elevate your cocktail experience with premium drinkware
Once you’ve mastered technique and refined your presentation, the right glassware is the ultimate finishing touch.

At The Gilded Cup, we believe that every well-made cocktail deserves a vessel that honors it. Our curated collection of luxury cocktail mugs and fine drinkware is designed for home bartenders who take presentation seriously. Whether you’re building a full home bar setup or searching for a standout piece, our white glossy mug and broader glassware selection offer the craftsmanship and elegance your cocktails deserve. Explore the collection and find the perfect complement to every drink you serve.
Frequently asked questions
What is the most important step for cocktail serving at home?
Chilling glassware and measuring precisely with a jigger are the two non-negotiable foundations for a quality cocktail experience at home.
How do I know when to shake or stir a cocktail?
Shake cocktails with citrus, dairy, or egg components; stir spirit-heavy classics like Martinis and Manhattans for clarity and smoothness.
Why is ice quality so important for cocktails?
Clear, dense ice chills drinks efficiently, melts slowly, prevents over-dilution, and keeps flavors crisp from the first sip to the last.
What’s the best way to garnish a cocktail for presentation?
Match garnishes to the drink’s dominant aromas and express citrus peels over the surface before placing them to release fragrant oils that enhance the first impression.
How can I batch cocktails without losing quality?
Pre-chill your serving vessels and use large, clear ice cubes to maintain controlled dilution and serve batched drinks quickly before temperature rises.